Have you ever been frustrated trying to get a perfect quarter-inch seam when quilting? If so, you’re not alone! Achieving this perfect seam width can be challenging, but it can be a breeze once you get the hang of it. Dare I say, the most foundational yet elusive step in quilting is sewing a perfect quarter-inch seam. It may seem like a small detail, but keeping your blocks square and uniform throughout the entire project is essential. I am sharing my top tips for achieving the perfect quarter-inch seam in quilting every time.
Why Are Quarter-Inch Seams Important?
Before we learn how to achieve the perfect quarter-inch seam, let’s talk about why they are so critical in quilting. Quarter-inch seams are essential because they help keep your blocks uniform and square as you piece them together. Suppose your pieces are not cut accurately and sewn with precise seam allowances. In that case, your blocks and quilt will be uneven or misaligned. The key is to ensure that each block has been sewn with an exact quarter-inch seam allowance so that all the blocks fit together perfectly when you assemble them.
What happens if you don’t use a quarter-inch seam allowance?
You may not realize it, but sewing just 1/8” off your seam allowance at each seam could yield a big difference after sewing a row of quilt blocks together!
The diagram below shows a perfect quarter-inch seam allowance in these blocks. The bottom graphic shows the row’s size difference when each seam allowance is just slightly off. Even an eighth of an inch can add up over an entire quilt and cause your blocks to be the incorrect size, which can cause problems aligning your seams and completing your blocks!
How to Sew a Quarter-Inch Seam
Now that we know why a quarter-inch seam allowance is so important let’s talk about a few ways how we can achieve them! With all these methods, you should always ensure that you test the accuracy of the method you are using.
1/4” Pressing Foot:
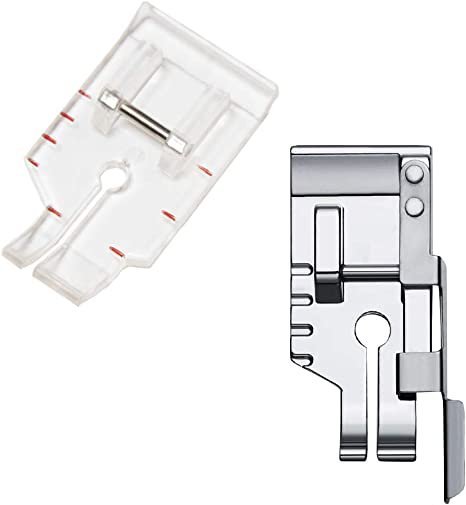
One of the best ways to sew an accurate quarter-inch seam is to use a ¼ inch foot on your sewing machine. These special attachments help guide your fabric along as you sew, ensuring that you get an even seam allowance every time. Even though you are using a quarter-inch pressing foot, you’ll want to ensure that you test and measure the seam allowance. Don’t blindly assume the measurement is accurate!
Sewing machine plate:
The plate on your sewing machine can also be a great guide. Most sewing machines have measurements on the plate. Still, again, you will want to ensure that you are double-checking the measurement to ensure it is accurate. Once you’ve identified the accurate measurement, you can use tape or cardboard to maintain the guide for your fabric.
Sew Steady Grid Glider:
The Sew Steady Grid Glider is a 12” x 20” mat that clings to your sewing machine bed without permanent adhesives. There are grid lines and angles marked on the mat for you to identify your seam allowance.
Diagonal Seam Tape by Cluck Cluck Sew:
Cluck Cluck Sew designed this Diagonal Seam Tape to be appropriately placed on your sewing machine bed to mark your quarter-inch seam allowance. It’s similar to washi tape, so it is easily removable and won’t leave a yucky residue on your machine.
Laser Guides:
Some sewing machines have built-in laser guides for your seam allowance. Genius! They also sell aftermarket lights that can attach to your machine as well!
Magnetic Seam Guide:
This guide attaches to your sewing machine plate with a magnet. You can use my suggestions below to find the quarter-inch measurement from your needle position and then place the guide in position. The guide allows your fabric to be accurately lined up to ensure your accurate seam allowance. I have heard that it is possible these magnets should not be used with certain computerized machines. So always check your manufacturer’s manual to be safe.
Testing your allowance
No matter which method you use to find your quarter-inch seam allowance, I suggest you always test this before relying on it! I also suggest that you test with the same (or very similar) fabric and thread as you will use in your project. You also want to make sure that you press in the same direction as how you would in your project. So now, let’s test that seam allowance!
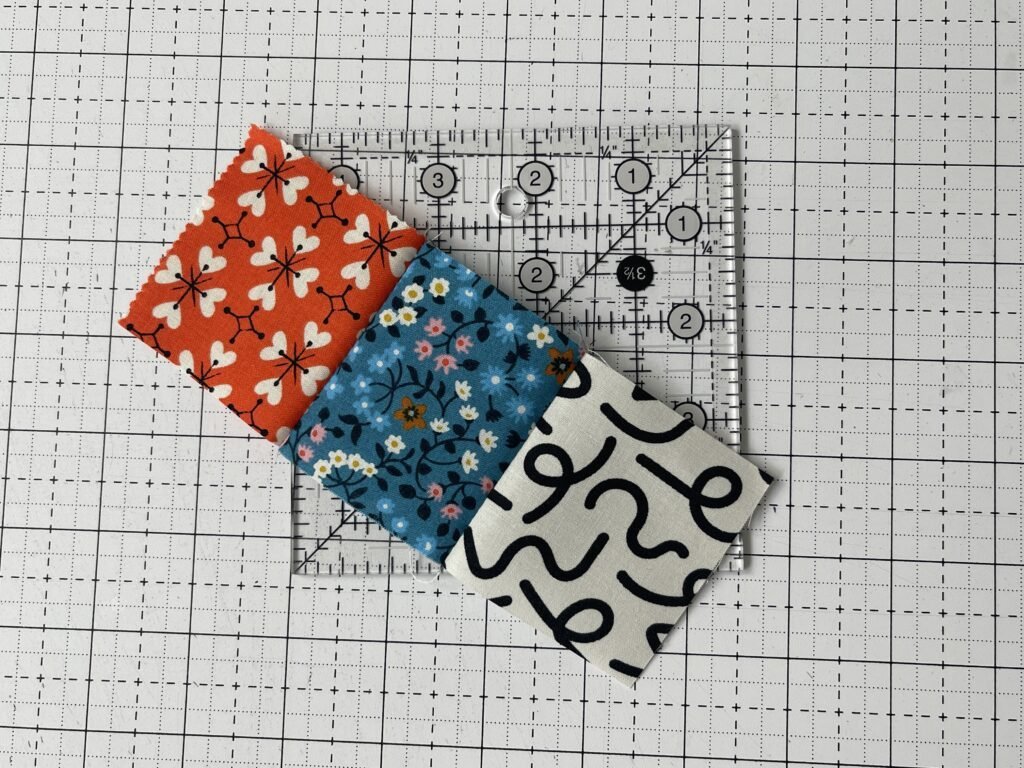
-Cut (3) 2.5” blocks, place two squares right sides together and sew a quarter-inch away from the edge. Open up and place another fabric square right sides together and sew.

-You’ll now have a row of 3 blocks.
-Measure each of the seams to make sure they are a quarter-inch.
-Use a quilting ruler and measure the middle block from edge to edge. It should measure 2” across. If it does, congratulations, your hard work has paid off! If it doesn’t, then check your seam allowances. Suppose your squares were accurately cut and your seam allowances are a proper quarter-inch. In that case, the difference could be caused by the thickness taken up by the fabric, thread, and the actual seam. In this case, you may need to sew with a scant quarter-inch seam. Read my tutorial HERE all about the scant quarter-inch seam.
Conclusion
Achieving a perfect quarter-inch seam in quilting can seem daunting at first glance. Still, with practice and patience, any quilter can master this skill in no time! By following these simple steps, you’ll be well on your way toward creating beautiful patchwork and quilts with perfect seams each and every time!
Affiliate Disclosure Policy: This website uses affiliate links, and I may earn a small commission if you purchase through these links. Please note that I’ve linked to these products purely because I recommend them and they are from companies I trust. There is no additional cost to you.


