Preparing your fabric is one of the most important steps for a successful quilting project! In this guide, I’ll walk you through the essentials of getting your fabric ready, including pre-washing, ironing, and starching. These simple techniques will help ensure your fabric is clean, smooth, and perfectly crisp for accurate cutting and piecing. Whether you’re a beginner or a seasoned quilter, learning how to properly prep your fabric will make a big difference in the final result of your quilt. Let’s get started and set your quilt up for success! You’ve gathered all the fabrics you need for your next quilt-making project – it’s time to sew… right? Well, not quite!

Before you can start piecing your quilt, there are a few steps you’ll need to take to prepare your fabric for sewing.
Prewashing your quilting fabric
First, let’s talk prewashing….
Why prewash quilting fabric?
There are a few reasons why prewashing your quilting fabric before starting your project is a good idea.
- It gets the shrink out of the fabric. Many fabrics, and especially cottons, shrink the first time they’re washed and dried. This means that if you make your quilt without prewashing the fabric, the first time you wash the quilt it will experience some shrinkage. Now, this may not be a bad thing! A quilt that shrinks some on the first wash gets a beautiful, crinkly, well-worn look instantly. But if you don’t like the crinkled look and plan on washing the finished quilt – don’t skip the prewash!
- It cleans the fabric and removes excess dyes and chemicals. Just because your new fabric came straight home from the fabric store in a nice, clean bag doesn’t mean the fabric is really clean. Your fabric has made a long trip from the manufacturing plant, to a warehouse, then ultimately to your local fabric store – so it had plenty of time to pick up a few dust bunnies. Also, prewashing can remove excess dyes and chemicals left over from the manufacturing process. Removing these chemicals may not be necessary for everyone, but if you have sensitive skin, prewashing can help!
Do you need to prewash before quilting?
Now that you know the ‘why’ of prewashing, you may still be wondering: is it really necessary? The answer – it depends.
If you don’t mind a slightly crinkled look for your quilts, you should be fine to skip the prewashing and just wash the finished quilt when you’re done. Just remember to never wash a quilt top – wait until the quilt is finished before washing! Also, if you’re using flannel, you may want to consider prewashing. Flannel tends to shrink a lot, quite a bit more than standard quilting cotton.
If you use high quality quilting fabrics, you may not need to prewash. Many higher-end manufacturers use methods to ensure that the dyes are fully set and that the fabric will experience minimal shrinkage the first time you wash it. Some fabrics are even sold as “prewashed” – meaning this time-consuming step is already done for you. Check the information provided by the manufacturer of your fabric to see if you will need to prewash.
How to prewash your quilting fabric
If you’ve decided prewashing is for you, here’s how to do it.
First, sort the fabrics into groups of like colors to help prevent bleeding. You don’t want to mix white with navy blue, for example. Wash and dry each set of fabrics using the settings you plan to wash the finished quilt with. You can check the care instructions for your specific fabrics to ensure you’re using the right settings.
Make sure to unfold and fluff out your fabrics so that they will be washed evenly and thoroughly.
How to combat bleeding when washing a quilt
Bleeding can be a major problem when working with quilting cottons. This is especially troublesome when you’re washing a quilt made with a mixture of light and dark colors. It’s heartbreaking to ruin all that hard work on the first wash!
To prevent bleeding, try throwing in a Shout Color Catcher sheet every time you wash a quilt. These sheets help to lock in the dyes and prevent bleeding. You can also use these sheets when prewashing fabric.
Ironing your quilting fabric
Whether or not you decide to prewash, ironing your fabric before cutting into it is essential for getting the best results from your quilting.
It may seem like a few wrinkles won’t affect your pieces at all, but if you cut a piece from wrinkled fabric, that piece will be larger once you iron it flat. Quilting is all about precision and accuracy to fit your pieces together perfectly – using wrinkled fabric will make it difficult to piece your quilt accurately.
Iron your fabric using the “cotton” setting on your iron. If you’ve got some tough wrinkles, a little steam will help to pull them out.

Starching your fabric before quilting
To starch or not to starch? Many quilters love to use starch to help their fabric hold its shape while quilting. This makes the fabric more stable and easier to work with, helping you achieve more precise piecing. Fabric starching is especially helpful for narrow strips of fabric and triangles with a bias-cut edge.
When to starch
If you decide to starch, it is typically best to starch your fabric before cutting your pieces. During your pre-cutting ironing is the perfect time to apply fabric starch. This gives the fabric some rigidity and stability before cutting, allowing you to cut more accurately, and ultimately making piecing easier. Just keep this in mind: if you’re going to use starch, then starch all of your fabrics, not just a few of them!
Types of starch: a brief comparison
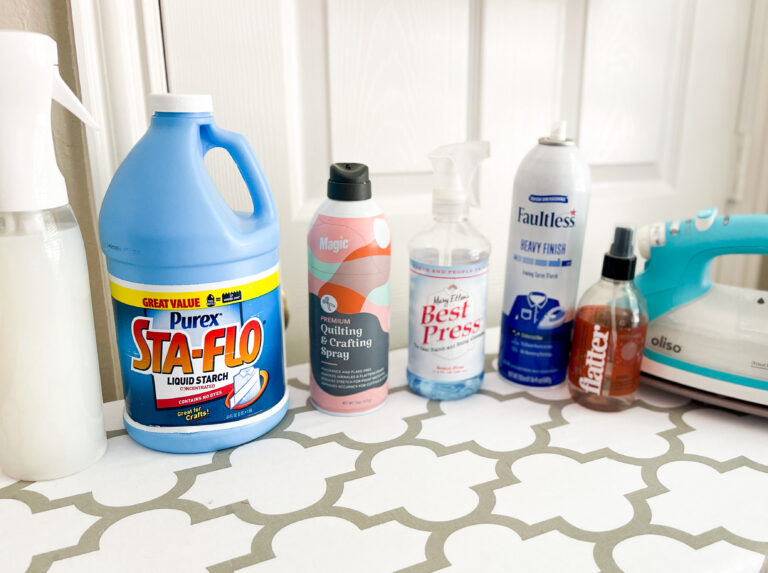
You’ve got options when it comes to fabric starch. Here are a few quilting favorites.
- Mary Ellen’s Best Press. Best Press is a spray starch alternative that has become a favorite among quilters. It gives your fabric body and stability without making it too stiff. Plus, it comes in some wonderful scents!
- Traditional and well-known commercial spray starches. They are easy to find and can add a lot of rigidity and stiffness to a fabric, great if you hate working with fiddly pieces. This is actually my favorite to use. I use a mixture of 50% liquid Sta-Flo starch and 50% distilled water. I mix them in this nifty super fine mister bottle and it’s perfect for achieving the stiffness and structure that I like when cutting and piecing. You can also use common starches like Niagara!
- Magic Premium Quilting & Crafting Spray is another great, easy-to-use option. I like the fine mist bottle or the aerosol is a good choice too for even spraying across your fabric.
- Make your own spray starch. If you’re looking for a more affordable or eco-friendly option, try making your own spray starch. There are quite a few different recipes available online.


Check out my video tutorial on various starch options!
How do you prepare your fabric before quilting? Drop me a comment and let me know!
Affiliate Disclosure Policy: This website uses affiliate links, and I may earn a commission if you purchase through these links. Please note that I’ve linked to these products purely because I recommend them and they are from companies I trust. There is no additional cost to you!


Comments are closed.